Speed up your charting so that you can spend more time with your patients!
Tired of charting for hours at the end of a day? Rushing to finish your chart before the next patient comes in? With OutSmart EMR, you can reduce your typing by up to 80% compared to other EMRs. Change your charting time from hours to minutes with features like Smart Lists, Smart Templates, and Smart Protocols. You can finish your chart before your patient even leaves your office!
Just like most EMRs, you can use basic charting with OutSmart, where you just type whatever information you want into a box. If you’re coming from paper charting, the main advantage is simply that you’re moving from hand writing your notes, to typing out your notes electronically.
The thing is, other than the fact that your information is typed out, there’s not a whole lot else that you can do with it. You may be able to type faster than you can write, which will save time, but the benefits are limited. With Outsmart Rapid Charting features, such as the SmartChart, there’s a whole lot more that you can do to save time and organize your chart notes so that it provides you with useful and easily accessible information on your patients!
Here’s an overview of some of our users’ favourite rapid charting features:
#1: Pro-Sections of your SmartChart
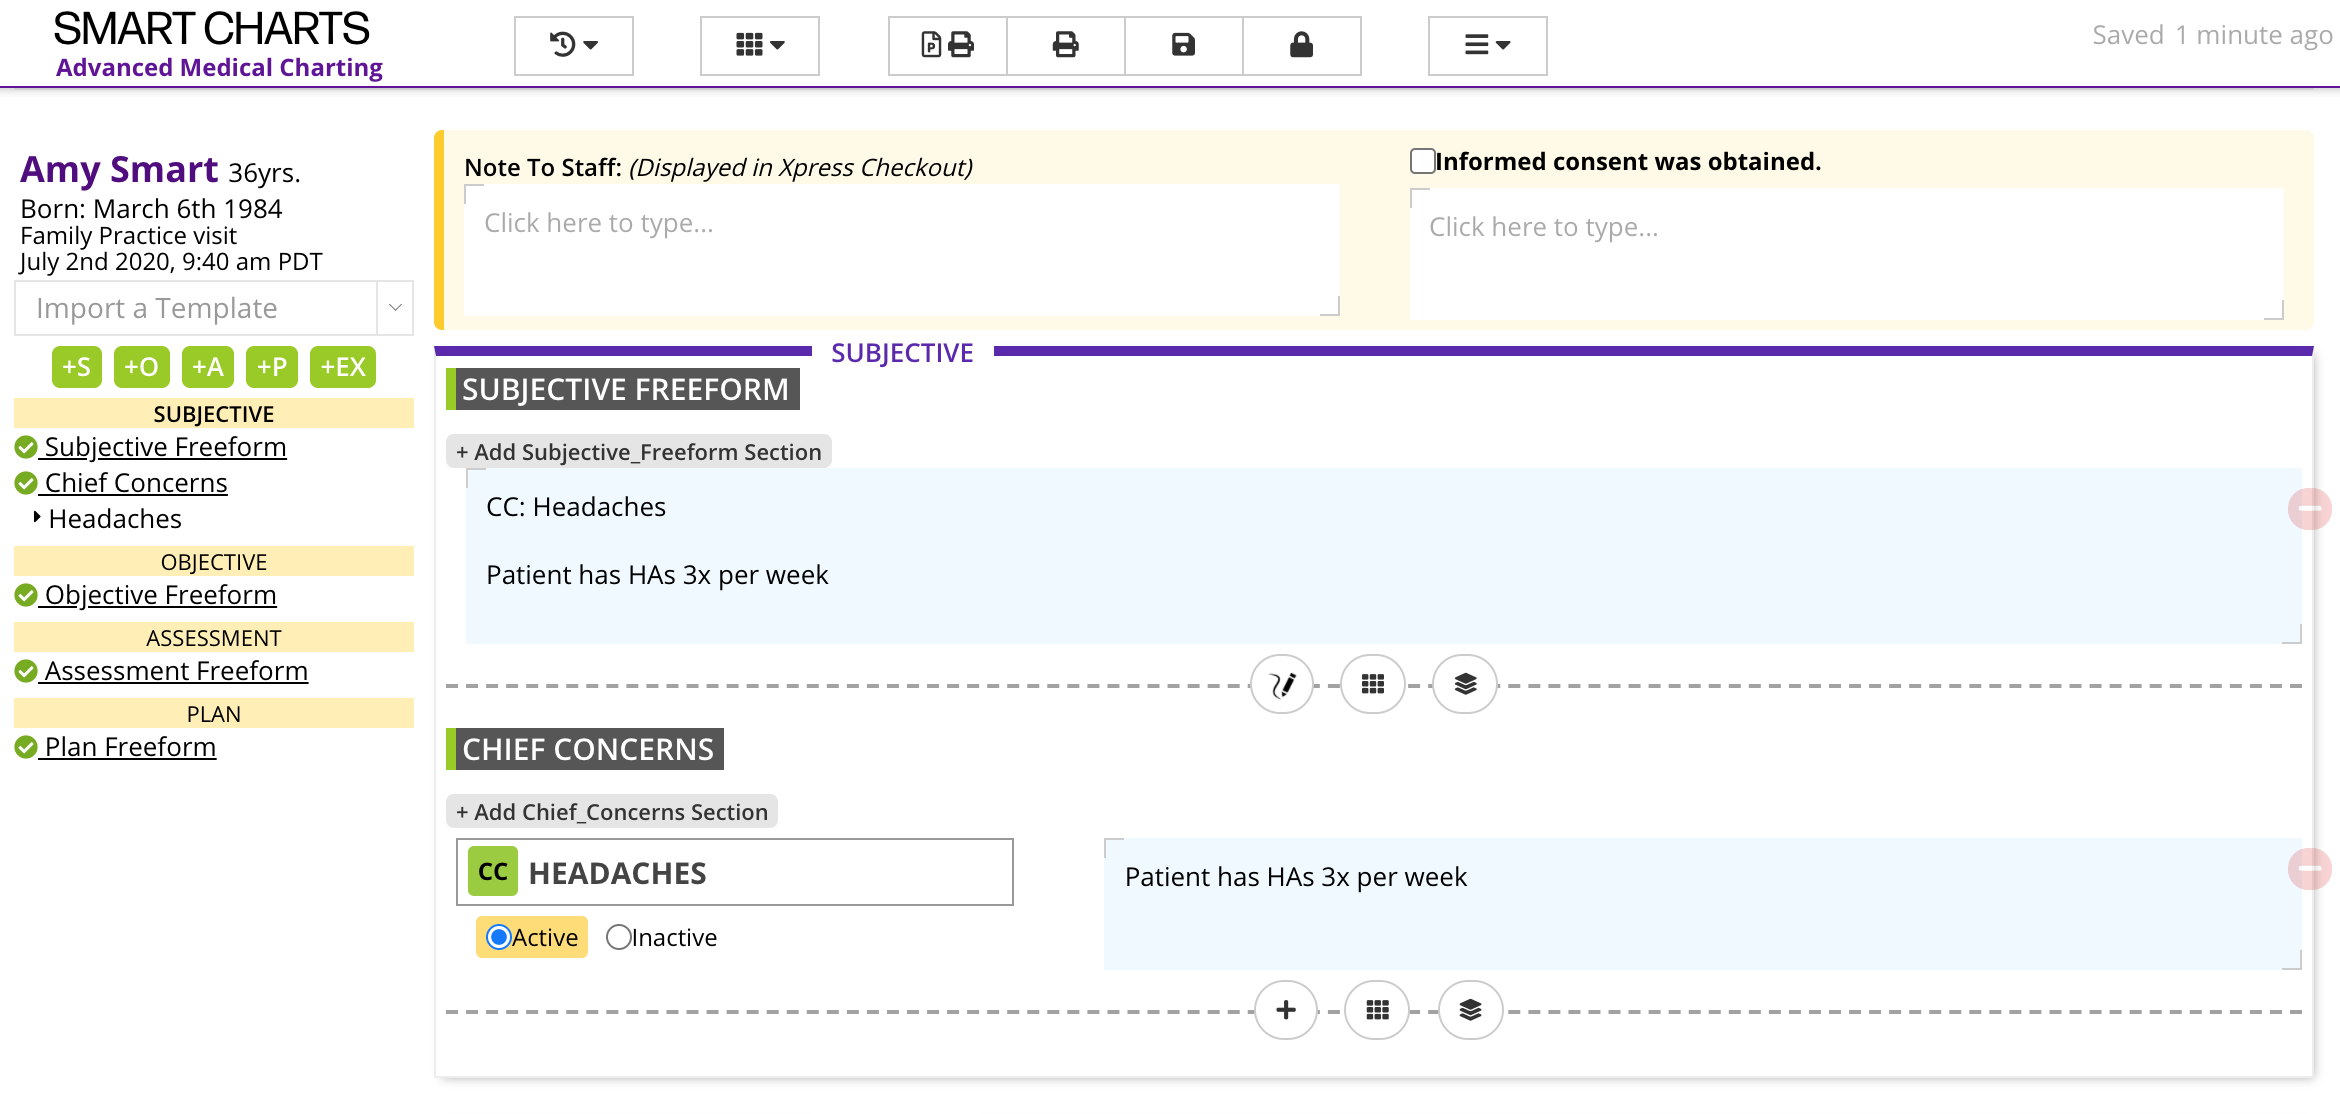
There are several advantages to using the SmartChart. Let’s start with the simple act of creating a pro-section. Instead of typing under each SOAP heading in sentence form, creating a pro-section organizes your chart in a way that makes it easy to quickly reference a patient’s chief concern in an index form. For example- if you were to add in a chief concern of headaches, you could type it in the free form box under subjective, which is the standard way of charting with many EMRs. With Outsmart, you could create a pro-section with headaches as the chief concern which has many benefits.

You can see the free form way of typing out a chief concern (top) which is how most people chart and the only method that most EMRs allow vs. creating a pro-section (bottom) which allows for advanced functionality. Notice the headaches under chief concern is now listed in the index on the side panel after inserting a pro-section, which helps as a navigation tool are more sections are added.
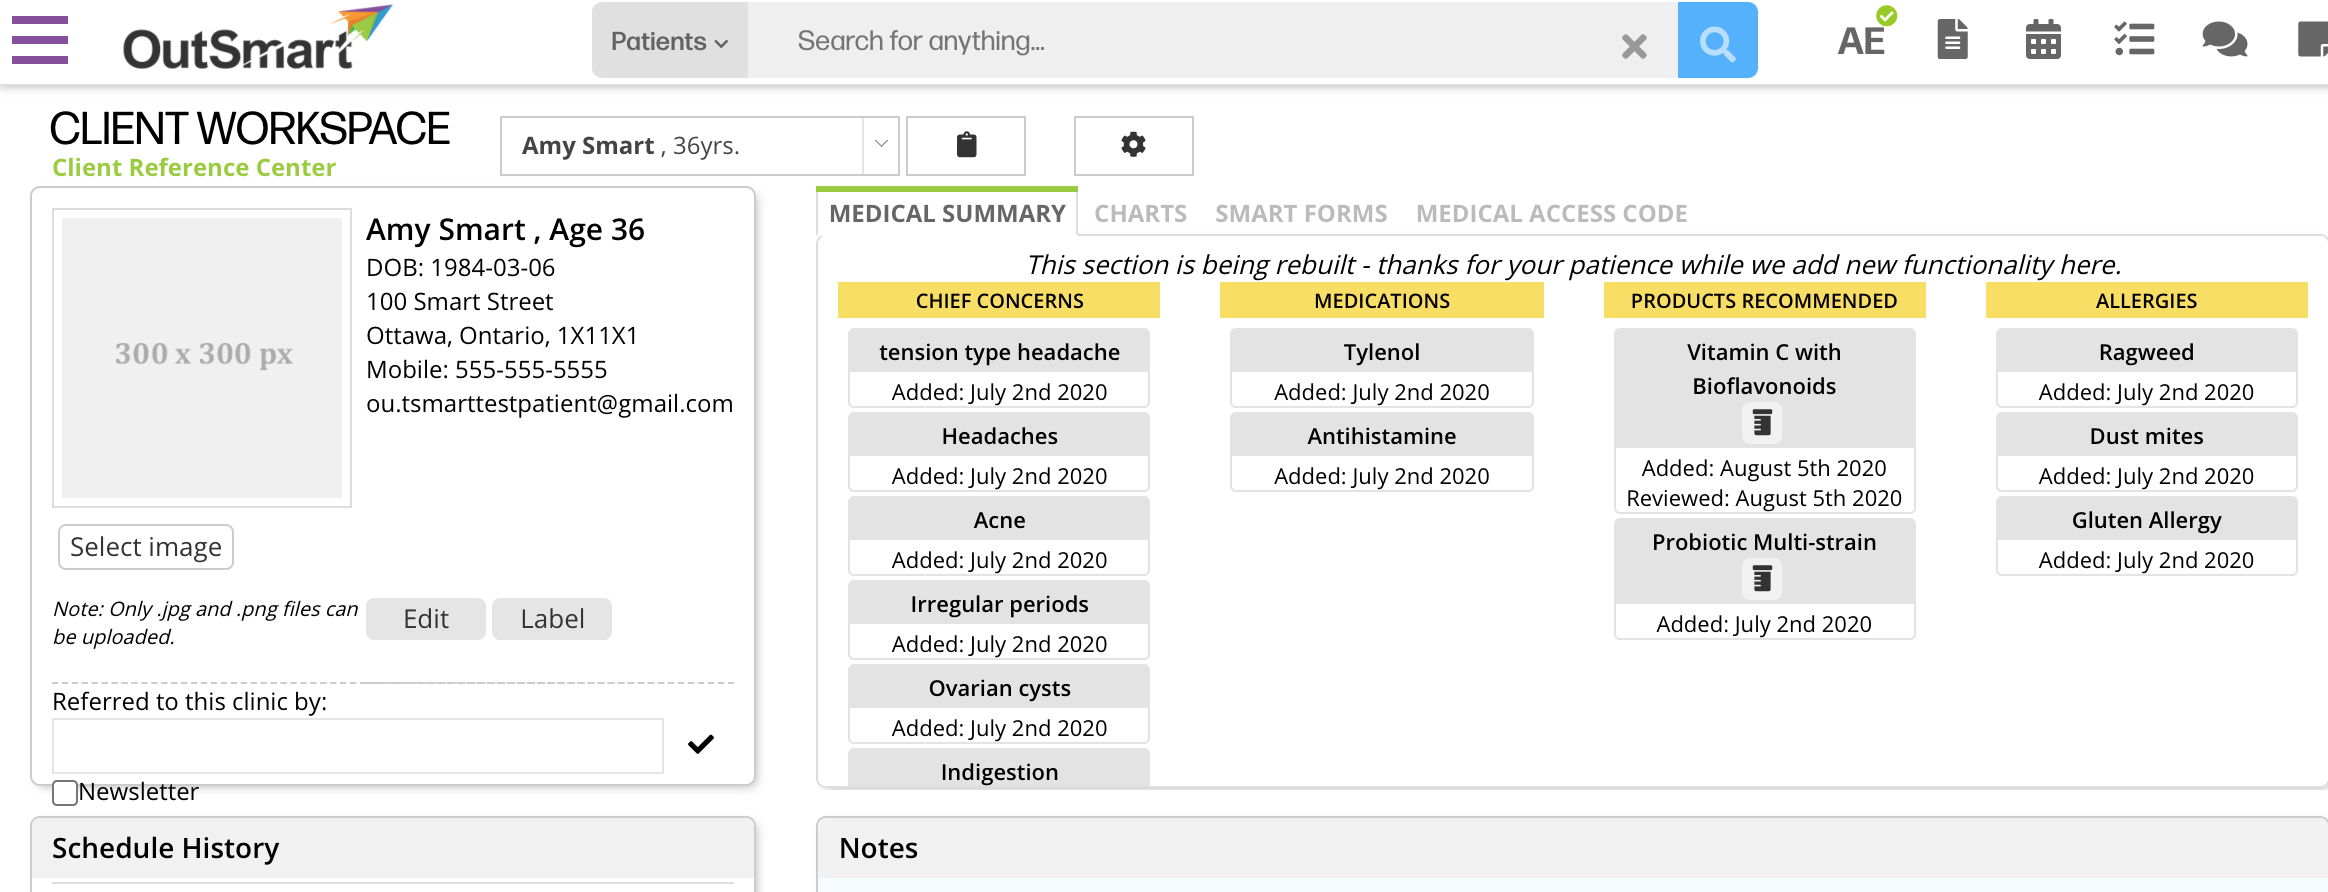
By creating a pro-section, you can then label these headaches as active or inactive (you can change this in subsequent visits). Not only does this give you a more organized approach to the chart as a whole, but it also makes it easier to track your data. OutSmart takes the information from a smart chart and provides analytics so you can more easily track these headaches through time. As you add these pro-sections, you’ll see an index on the side with titles of each section within the SOAP chart, so you can easily navigate your chart just by clicking on that section- the free form charting does not do this. Pro-sections are available for each part of the S, O, A and P of a chart. One of the best parts about using pro sections, is that those get automatically populated as summary lists within the patient workspace. You’ll see a medical summary with active concerns, medications, product recommendations, and diagnoses quickly without even opening the patient chart. This at-a-glance information is so convenient when you want to quickly recall information for any one of your patients.

This handy medical summary is available in the Client Workspace if you use the Pro-sections of charting.
#2: SmartLists
Smart Lists are a very useful part of the rapid charting features. They allow you to take snippets of text that you tend to type out repeatedly in your charts, and save them within many different sections of your chart. Smart lists are intended to reduce the amount of time you spend typing things over and over again. You type it once, “SmartList” it, then you never have to type it again. You can easily insert those Smart Lists within any Pro-section of your chart. For example, in the objective section of your chart, if there’s something you do often, you can save your observations to a list. Let’s say you do cardiovascular exams often and usually the findings are normal. Under the cardiovascular heading- you can type your findings then save this to a smart list. Next time when you are doing physical exams, under ‘cardiovascular’ you can easily pull up the description for a normal exam. The smart list saves information so you don’t have to keep re-typing this every time. You can create smart lists for all of your physical exam findings and allow yourself to chart detailed descriptions on the go while doing exams.
Smart lists are especially useful when creating treatment plans. Anything that you write out once for a patient can be highlighted and saved. If you are typing out a dietary suggestion for a patient with some examples of foods to avoid and lists of foods to increase- just add this so a smart list with one click and it’s saved forever! This works with product information and dosing, lifestyle suggestions like sleep hygiene tips or exercise regimes. Informed consent is another area where smart lists can save plenty of time. Any small pieces of information can easily be added to a list after you type it out one time!
Any Pro-section of the chart can have a Smart List added to it. Adding a smart list is good for any other common phrases or paragraphs of information that are used often.

Easily add saved SmartLists by typing the “@” symbol which will bring up a menu of all your saved smartlists for that Heading.
#3: Smart Templates
Creating Smart Templates can help greatly speed up your charting process. It is one of the most useful and time-saving features of OutSmart EMR. Smart Templates are like building blocks of a chart that you can combine in various ways to create your patient’s chart. The idea behind Smart Templates is to create specific templates of information which can later be combined to create a Medical Chart (like a SOAP Chart).
The best way to use templates is as building blocks. For example, you can pre-create various treatment plans for different conditions and save those as templates. You might have a set of supplements and dietary plan that you commonly recommend to patients who have PCOS. You can create an awesome treatment plan for PCOS and save that as a template. Similarly, you might also have a few different exercise regimens that you recommend for different situations, each of which can be typed out once, and saved as a template. If you have a PCOS patient, with the click of a button you can add the PCOS treatment plan template, then with another click you can choose one of your exercise plans that’s best suited for your patient and add that in as well. You can modify what you need to in order to individualize your plan for that specific patient, but the majority of typing is saved by using the Smart Template as your starting point.
While you can start off with a template, you can also convert any patient’s chart into a template to be used later on. For example, let’s say you see a patient with Hypertension during which you created a really great treatment plan. You can take that part of the chart (while deleting any of the patient’s personal information) and just save that as a Hypertension treatment plan template, that can be used in the future for other patients with Hypertension.
Smart Templates aren’t only for treatment plans. Any Pro-section can be saved as a template, and you can add several different pro-sections to create your template. You might have a specific format for a physical exam, or common questions that you ask all patients with a specific condition… all of these can be made into a template, which you can add to your chart at the click of a button. You may add as many smart templates as you’d like to your chart.
#4: Protocols
Another Rapid Charting Feature is the ability to save parts of your chart as Protocols. Protocols are different from Smart Lists in that they save information in a given section rather than under one heading.
Here’s an overview of where Protocols can be used to speed up your charting time:
Products
If prescribing a specific supplement, you can write out the dosage, description of that supplement and any additional information such as potential side effects. You can then save this as a protocol. Next time you are going to prescribe the same supplement you can insert the protocol so that you don’t have to retype any of the information. If you have various dosages for a given supplement, this is where a SmartList can come in very handy – you can save different dosages as Smart Lists, and simply insert the one that you want for that patient.
Acupuncture
If you practice acupuncture, Protocols can save a lot of time. Any set of acupuncture points can be saved as a Protocol, and later easily be added to your chart at the click of a button. For example, let’s say you commonly use a set of points for treating a type of headache. You can create a headache protocol, saving all the points for treating that condition. You can then insert this protocol when needed, and add in other points or take away based on the patient.
IV’s
If you use IV therapy in your practice, you’ll love the ability to create recipes for your different IV treatments, and save them like protocols which saves a lot of time for your charting! There are also pre-made questionnaires which apply to most Canadian standards before a patient receives an IV.
Measurements
Within the chart observations, you can add in several different measurements (weight, height, temperature, blood pressure, etc.). If you are working with patients on weight loss and you constantly are doing a group of measurements for your weight loss patients, you can group these together and create a protocol. So, you can create a protocol called “Weight Loss Protocol” and under that have: Weight, Height, BMI, Body fat, and Waist circumference. Next time when you chose the “Weight Loss Protocol under Measurements, your list of weight measurements will pop up. This not only saves you plenty of time, but it also maintains consistency.
You can see how using Outsmart’s Protocols feature can save a lot of time when it comes to your charting!
#5: In Line Chart History
Smart Charts also have a unique way of displaying previous charts. The chart history is visible while charting the current visit so you can reference past visits easily without having to open up the previous visit’s chart. You can easily copy the previous chart’s information into the current chart by clicking the “Append Previous Notes” button which is super helpful for when you are just writing the same information as the previous session.
Outsmart EMR makes your charting experience fast, easy and useful
As you can see, our main goal while creating SmartCharts was to make your charting as quick as possible. As part of our Rapid-Charting features, we provide plenty of different tools to recall information without re-typing it out in order to save you time. Type it once and you never have to type it again! Additionally, the Smart Chart allows your information to be displayed to you in a manner that is actually helpful for patient care, something that you can’t benefit from with just basic charting and most other EMRs.
If you’re ready to make the switch to Outsmart charting, you can book a demo here!
Already using Outsmart but not yet using Rapid Charting? Book a free training session today!
